VSBackup - (Visual Studio Backup) is a Visual Studio extension for backing up and restoring a solution without having to leave Visual Studio. VSBackup is a very useful extension if you are not using any version control or if you are in the prototyping stage. This is not a substitute for source control. Take care of your code files. Only full backups are performed.
In case you are encountering a problem or need to discuss something then you are welcome to contact us by email: support@lonestarsoftworx.com. Alternatively, you can create an issue item here.
All new development for VSBackup will continue in the Visual Studio 2022 version.
***** Looking for Beta Testers *****
We are always looking for beta testers. If you would like to be considered, please send an e-mail to beta.testing@lonestarsoftworx.com. You will receive an Amazon gift card and if you have not purchased the software, you will also get a free license.
Licensing
The license for VSBackup is perpetual which means that the license will never expire and will work for subsequent versions. Includes support that never expires.
The license is per developer and one machine. Multiple machines require multiple licenses.
License cost for VSBackup is as follows:
Visual Studio 2017/2019
Visual Studio 2022
Please contact sales@lonestarsoftworx for additional information regarding licensing.
Prerequisites
There are no prerequisites.
Known Issues
There are no known issues at this time.
Operation
Backup
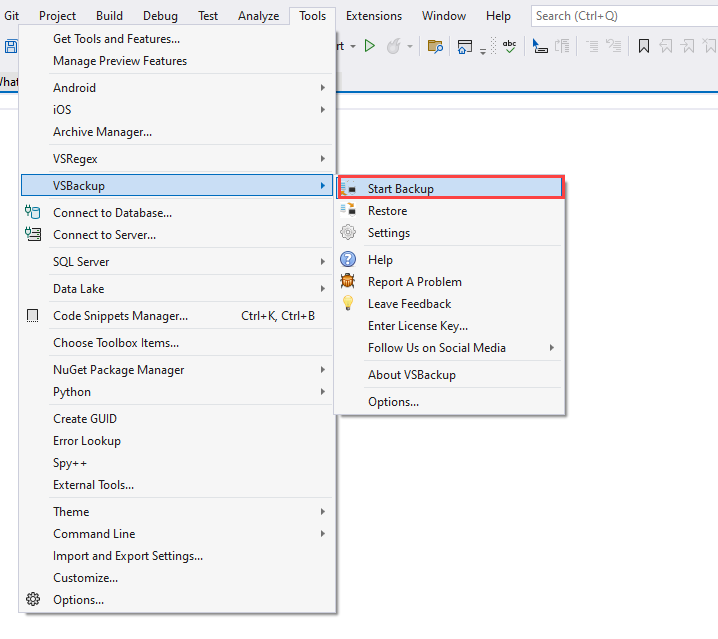
To start a backup, either load an existing solution or create one. You will find the commands for VSBackup located in Tools --> VSBackup. Only full backups are performed.
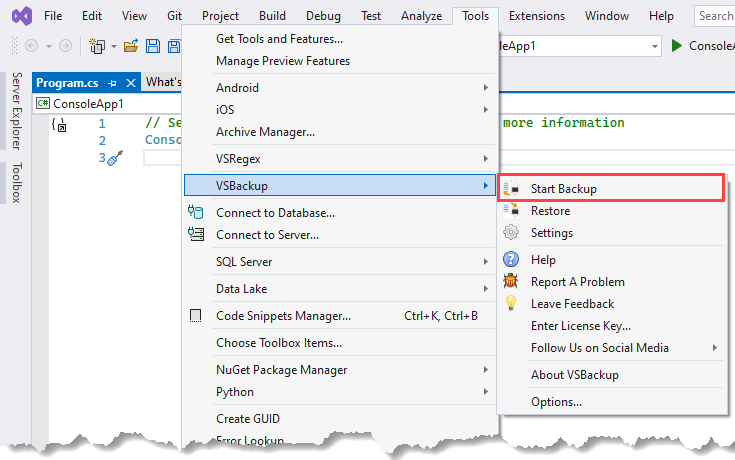
There are two ways to start the backup process. The first way is to right-click on the solution and then click the VS Backup – Start Backup menu item on the context menu.
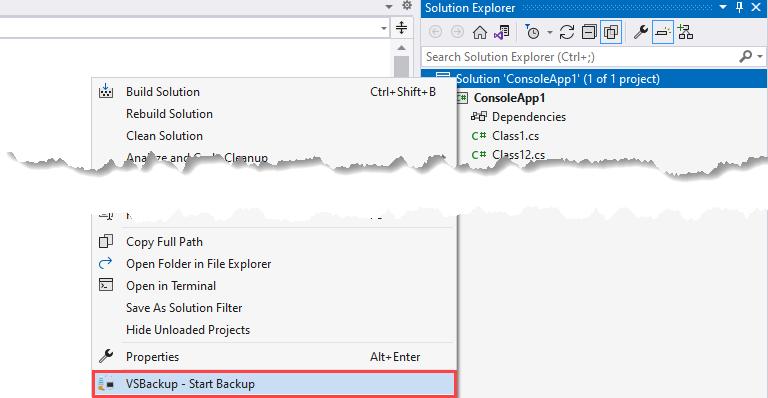
The other way is to click the Start Backup menu command located in the VSBackup menu on the Tools menu. If this is the first backup for the solution, the settings form will be displayed. Either change the location of the backup or accept the default backup location. See the Settings section for instructions. Click the OK button.
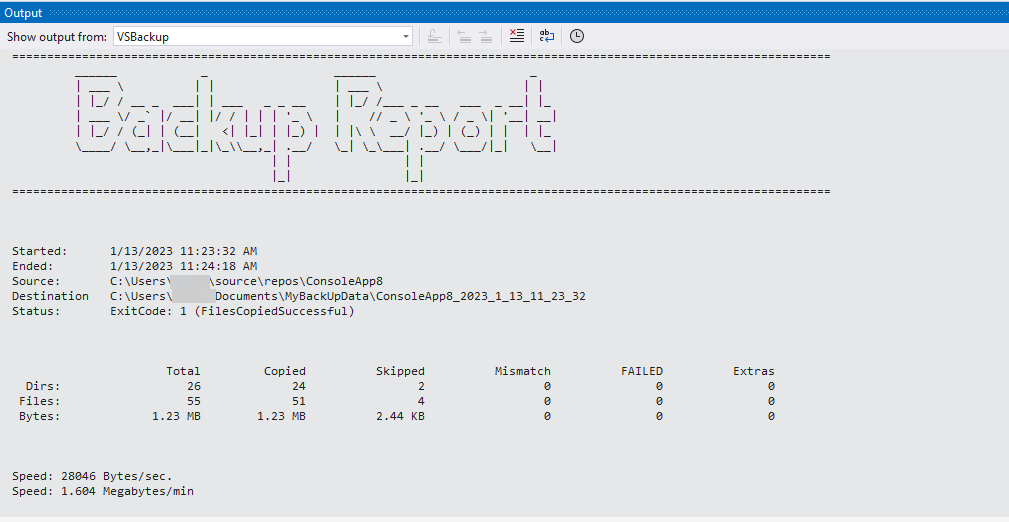
Once the backup process has completed, either success or failure, a message box will be displayed.
If you have selected the Backup Report option in Settings, the report will be diplayed in the output window.
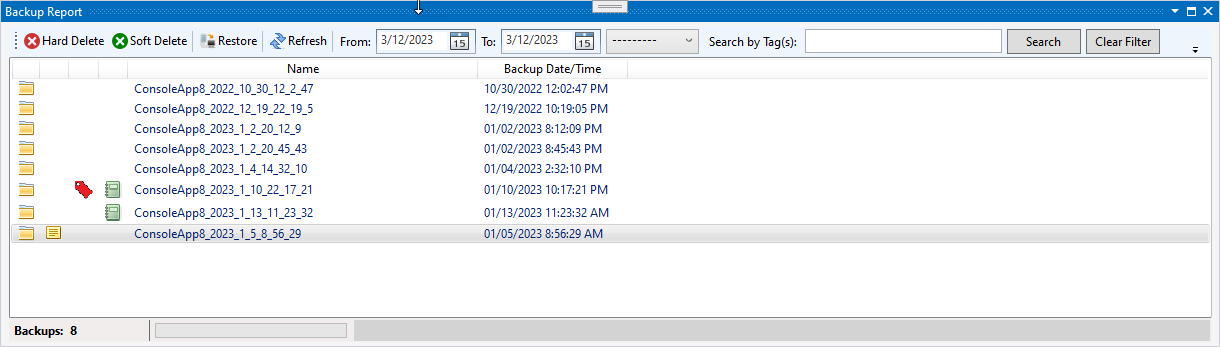
Viewing Backups
To view a list of backups for the solution, click View -> Other Windows –VSBackups – Backups
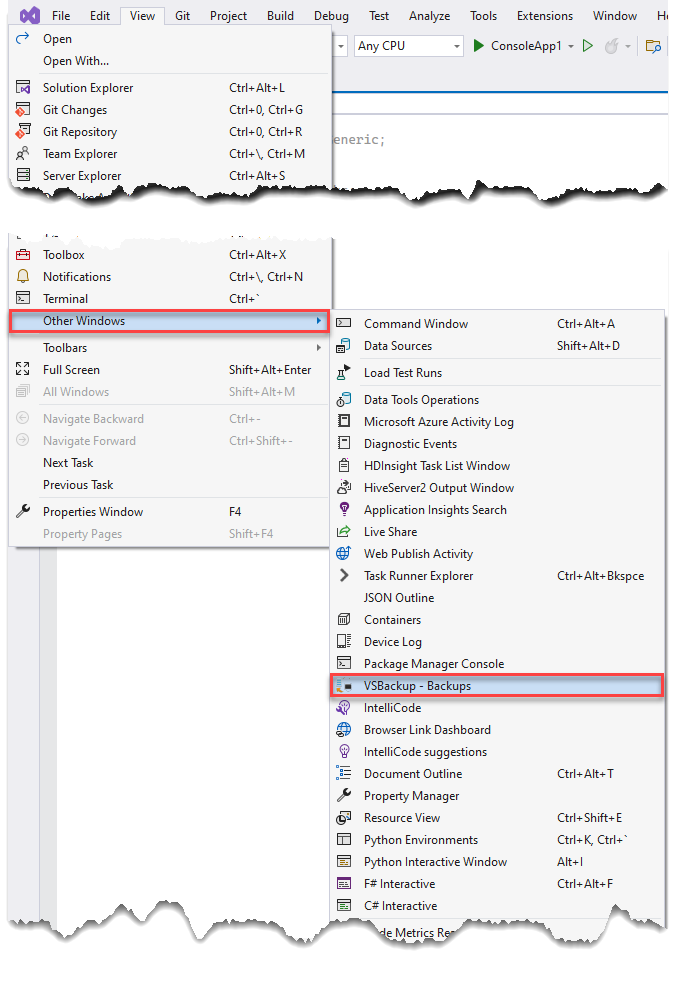
A window with the backups associated with the solution will appear.
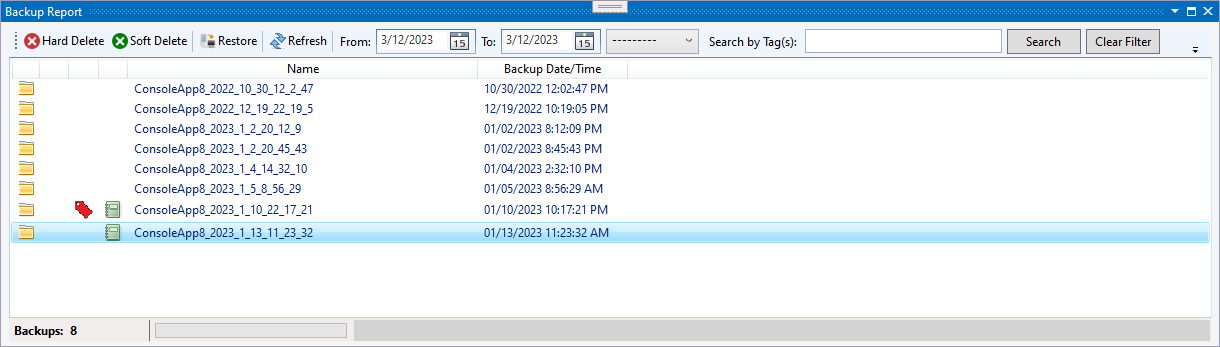
Each backup will have an image next to image denoting the type of backup.
Entries that have this image, will show that the backup was zipped. This image show that the folder was backed up without compression.
You can now sort the backup entries by either the name or by the Backup Date/Time. Click the column you want to sort by and it will sort by ascending or descending order.
- Hard Delete Deletes the backup from the list as well as the backup location.
- Soft Delete Deletes the backup from the backup list only.
- Restore Restores a backup to a specified location.
- Refresh Refreshes the backup list.
- From/To Allows you to filter the backups by date. To revert to the complete list of backups, click the Refresh button.
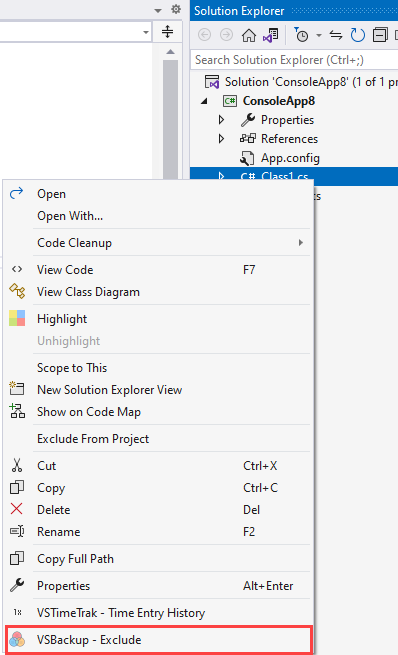
To exclude items from the backup process, right-click on any document and select VSBackup - Exclude.
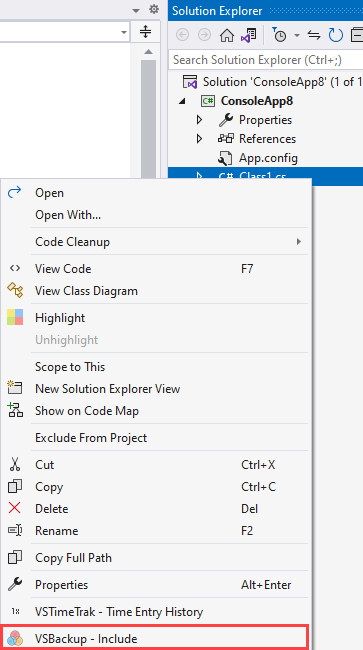
To include the item in the backup process, right-click on any document and select VSBackup - Include.
This feature is not available yet for directories. It will be added in a future release.
Restore
To restore a backup, select the backup from the Backups tool window.
Click the button labeled Restore on the Backups tool window, right-click on the selected backup and click Restore, or click the Restore button in the VSBackup menu.

When the dialog box appears, select the location where you want to restore the solution to. To make a new location, click the Make New Folder button. Click the OK button.
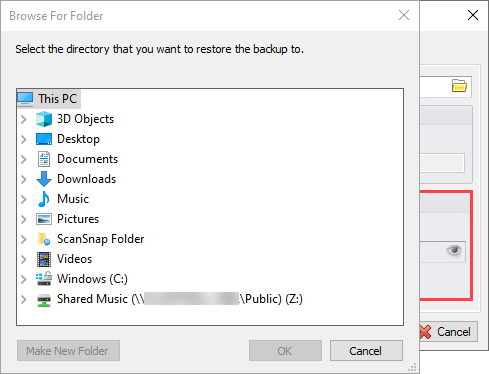
Once the restore process has completed, either success or failure, a message box will be displayed
Backup Note
You can add a note or edit an existing note to a backup.
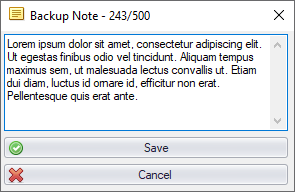
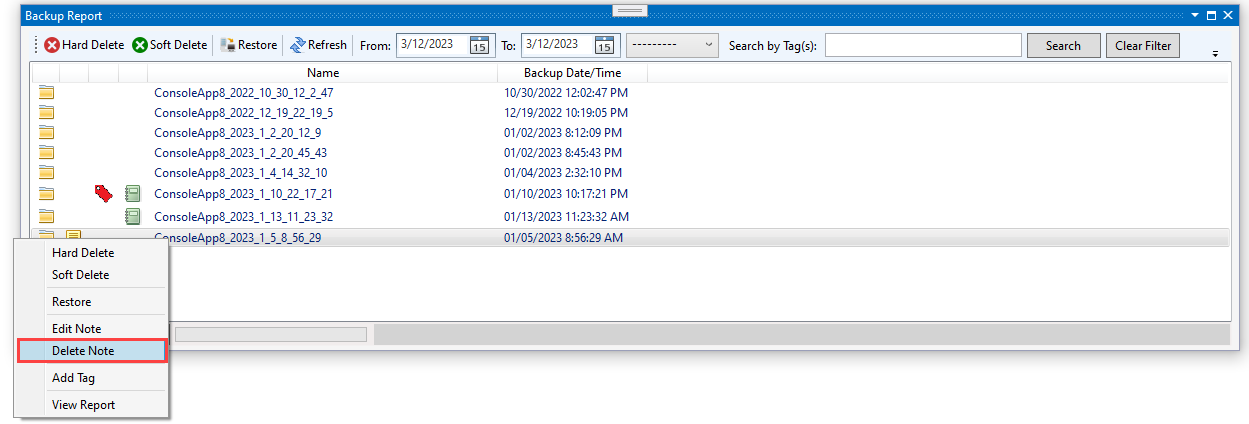
Right-Click on the backup you want to enter a note for. Click the Edit Note menu item.
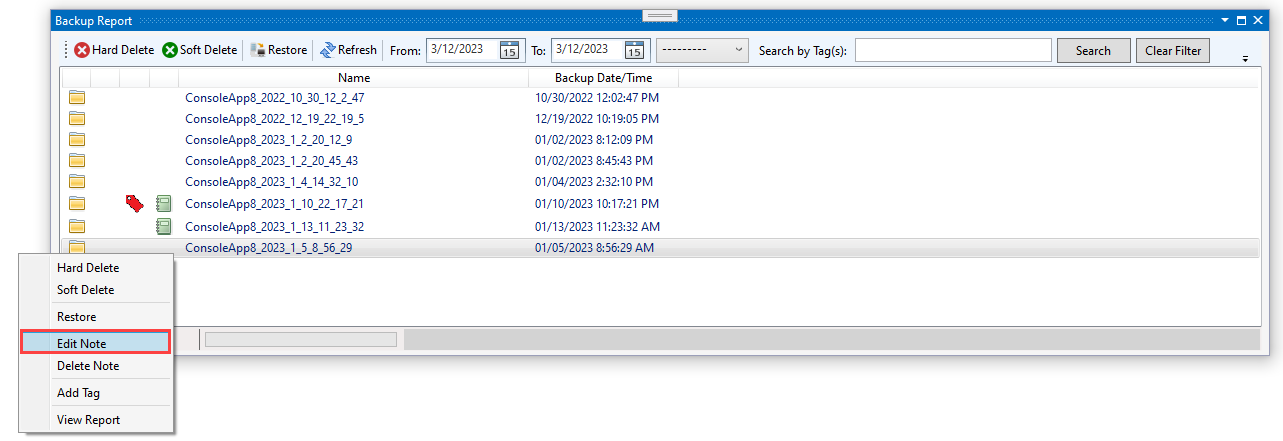
Enter the text of the note. To save the note, click the Save button. To cancel the save, click the Cancel button.
The  icon will appear next to the backup.
To delete the note, click the Delete Note button.
Backup Tag
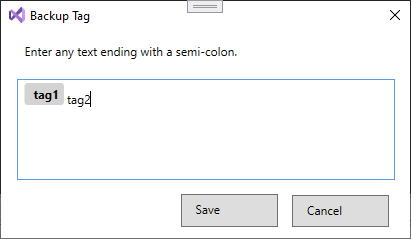
To add a tag, select the backup and then right-click. Click Add Tag.
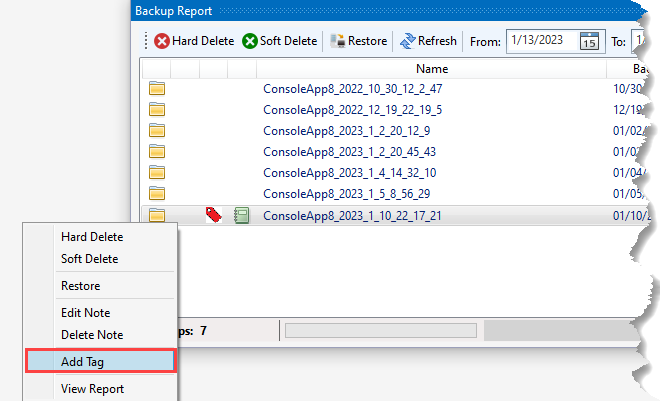
This form will be displayed. Enter tag(s) and then end with a semi-colon. Click the Save button to save the tags. To close the form, click the Close button.
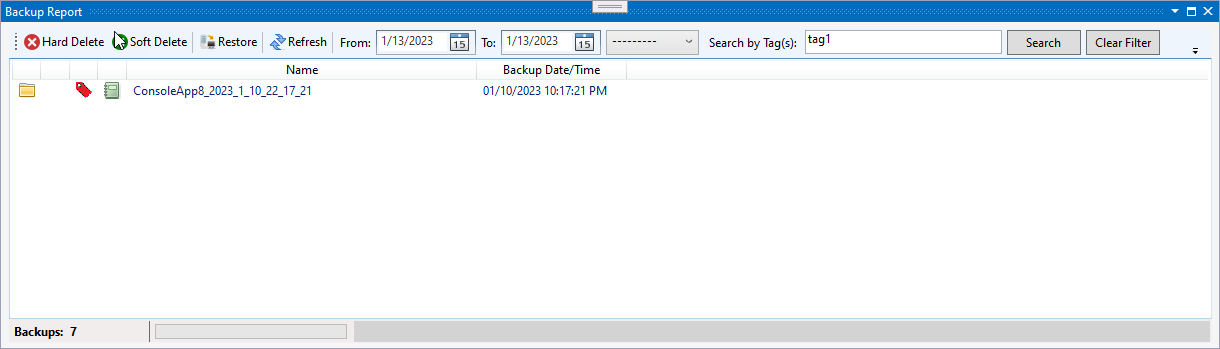
To view the tags associated with a backup, the backup will have the [icon] next to it, right-click on the selected backup and click on Add Tag.
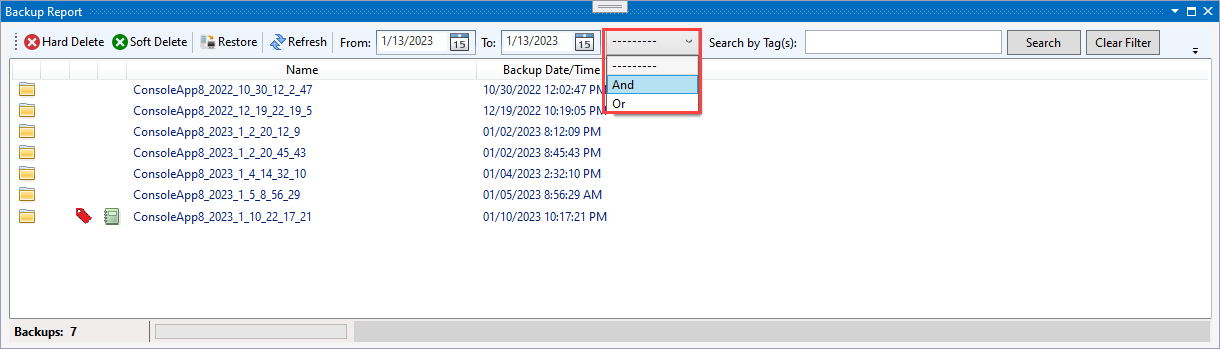
To search for backup with a tag or tags, enter the tag(s) in the Search By Tag(s) textbox. Separate each with a comma. Click the Search button to initiate the search.
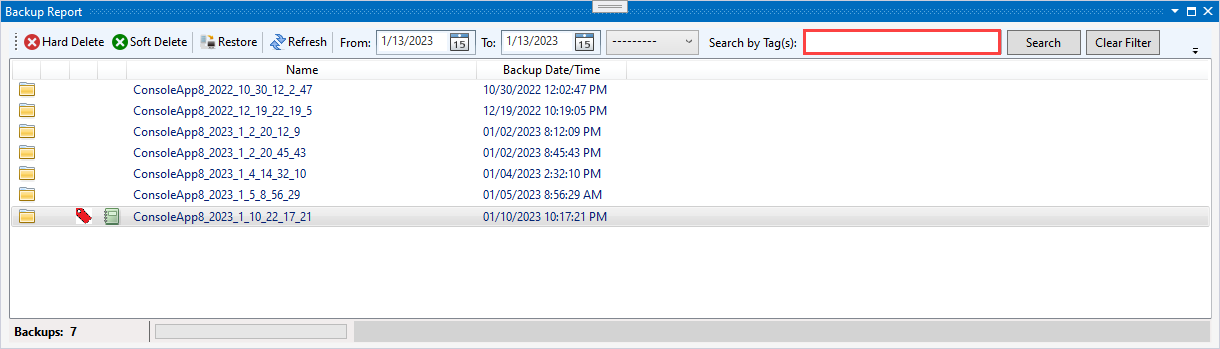
Backups meeting the criteria will then be listed.
To combine the date ranges with the tag search, select the proper operator from the drop-down and then clicking the Search button.
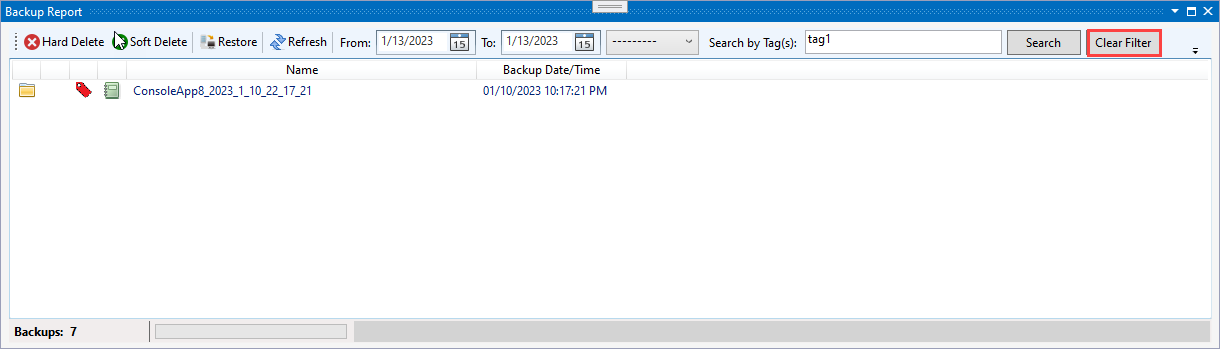
To clear the tag search textbox, click the Clear Filter button.
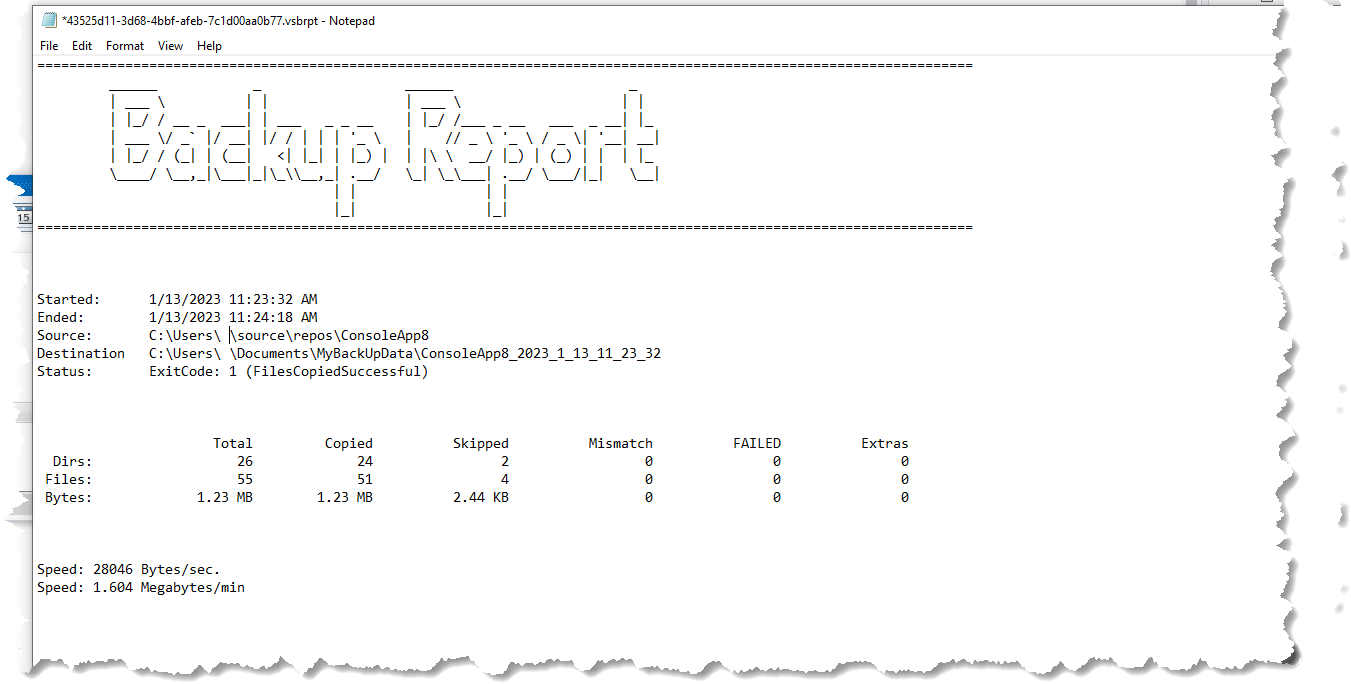
Backup Report
Backups that have a report, will have the  next to it. To view the report, right-click on the selected backup, and then click on View Report.
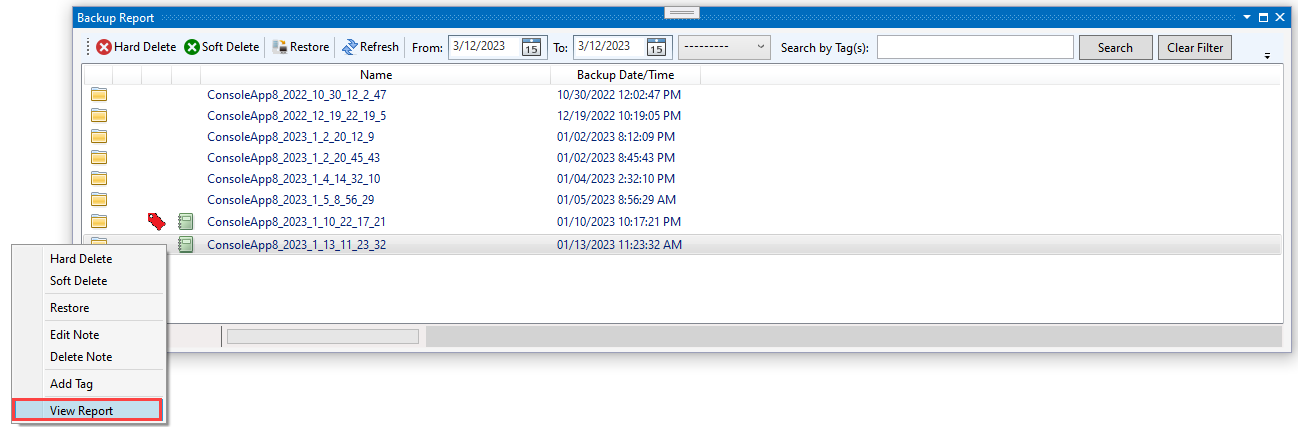
The backup report will then open in Notepad.
Settings
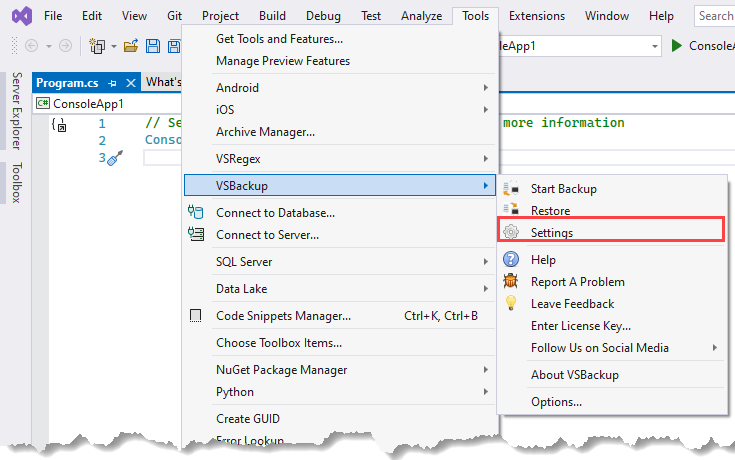
To change the settings for the backup and restore, click the Settings menu command located in the VSBackup menu.
The following form will be displayed.
Backup Settings
Location
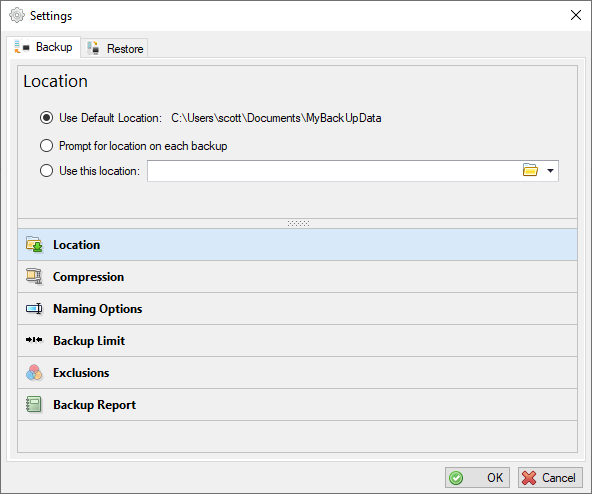
To select a location for the backup, select one of three options:
- Use Default Location The backup will always be stored at this location.
- Prompt for location on each backup Displays a prompt for the location of the backup.
- Use this location
Allows you to either type in a location, select a location by clicking the folder button,
 or selecting a previously saved backup location by clicking the drop-down arrow.
Compression
To Zip (compress) the backup, enable the Zip Backup option.
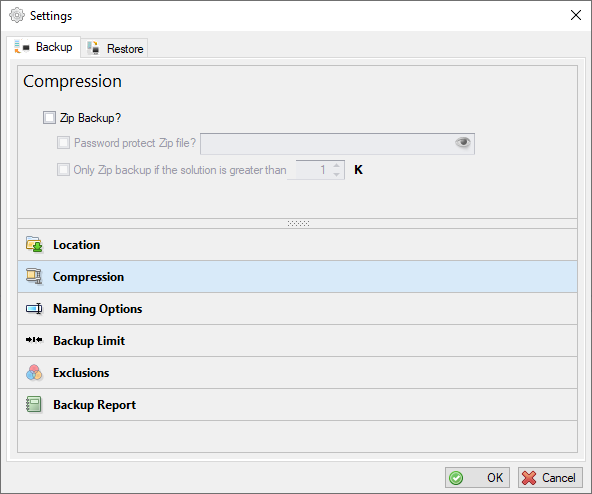
To password protect the Zip file, enable the Password Protect Zip File? option. Password must be at least 8 characters in length. To view what you have typed, click the button. To hide what you typed, click the button.
To only back up the solution directory if the folder size is greater than a certain amount, click the Only Zip backup if the solution is greater than option and enter an amount.
To save the settings, click the OK button. To discard any changes or just to exit the form, click the Cancel button.
A form will appear listing the selected and entered options. You can turn this form off and on by going to Tools Options VSBackup General Settings and checking or un-checking the Show Backup Summary Options.
Naming
There are three options for naming the backup:
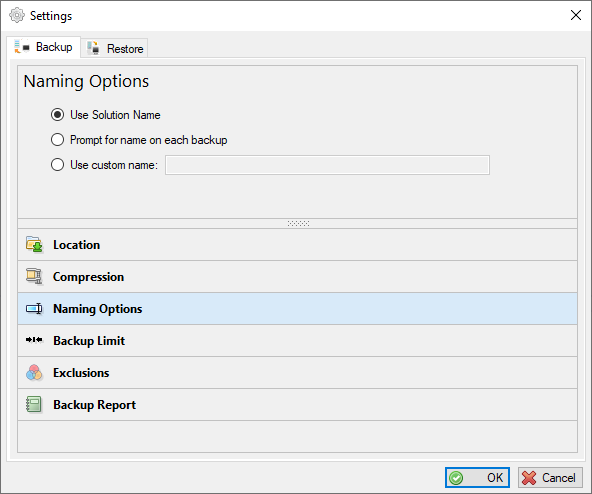
- Use Solution Name The backup will have the same name as the solution.
- Prompt for name on each backup Displays a prompt for the name of the backup on each backup.
- Use Custom Name The backup will have the name of whatever is entered into the text box.
Backup Limit
There are three options when limiting the number of backups:
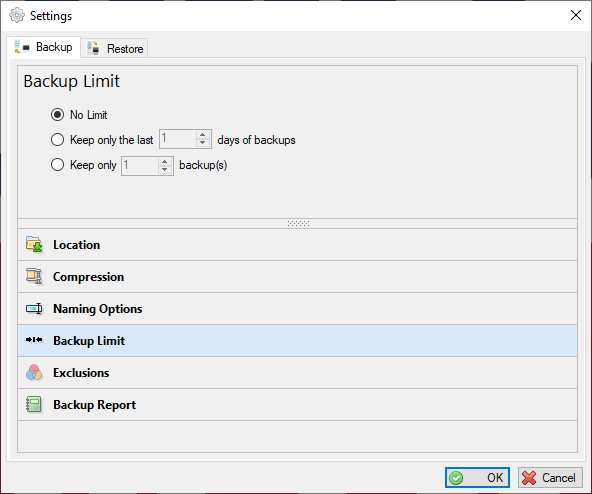
- No Limit Any backups older than the specified days will be deleted.
- Keep only the last # days of backups Displays a prompt for the name of the backup on each backup.
- Keep only # backup(s) The number of specified backups will be kept.
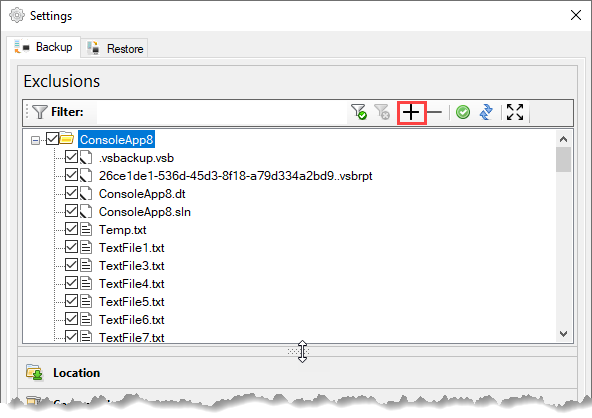
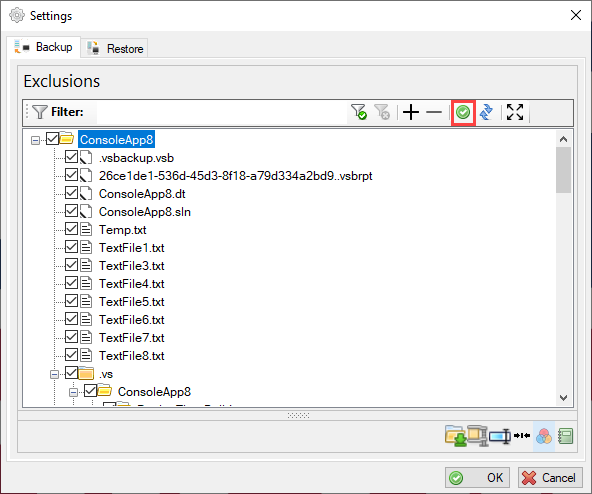
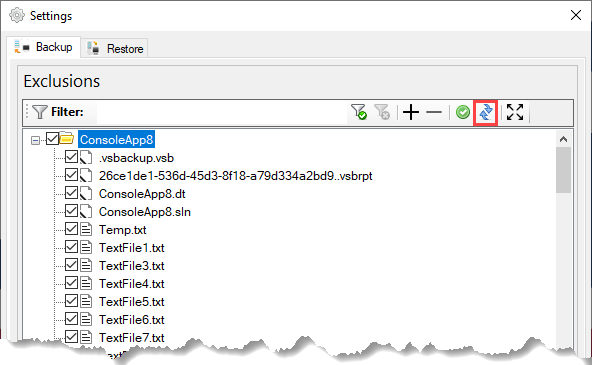
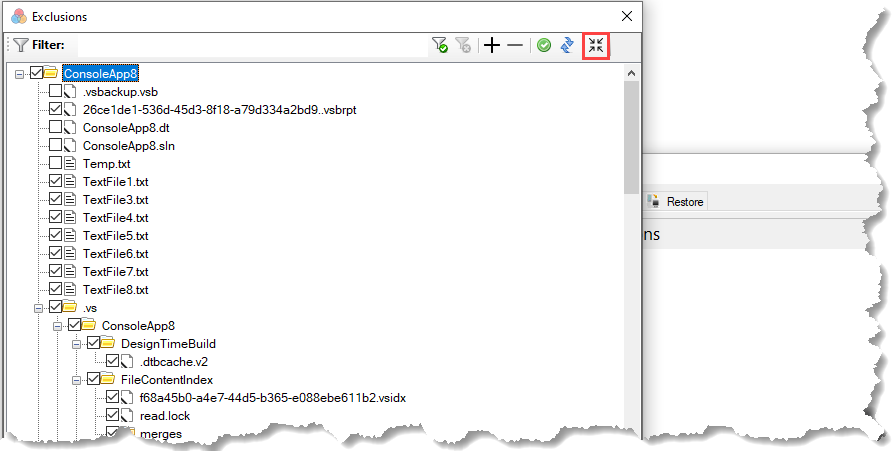
Exclusions
To exclude items from tha backup process, select Exclusions.
If the Project directory name is changed where the excluded item(s) are located, you must change the path in the data file or it will cause the backup process not to exclude the item(s). The data file can be found here: %AppData%\Roaming\LonestarSoftworx\VSBackup
To expand the view of the list, grab the bottom of the list and pull down.
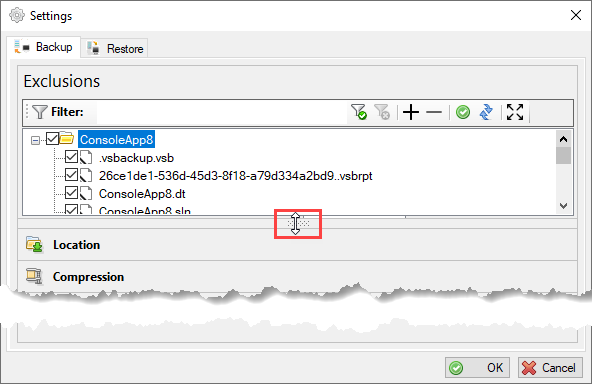
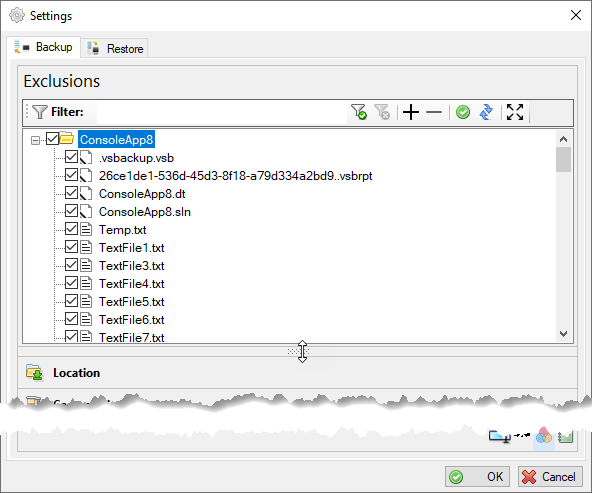
To exclude a file, un-check it. Un-checking a folder will exclude all of those files and subdirectories in that folder.
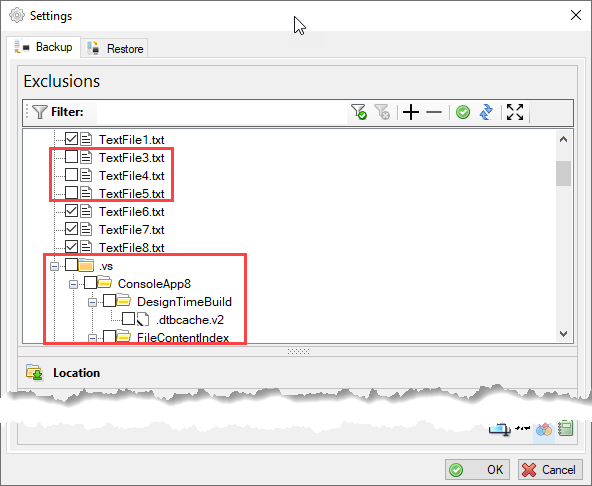
To include it back into the backup process, check it.
To filter the list, type your search text into the filter text box.
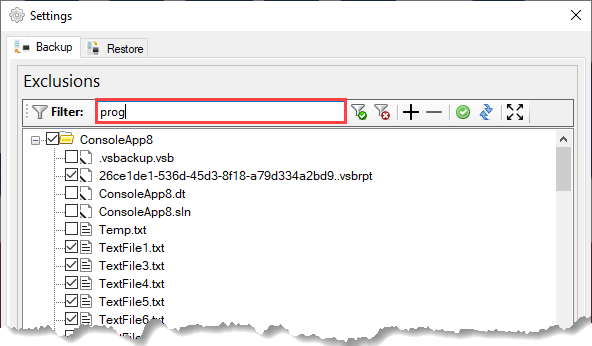
To execute the search, click the  button.

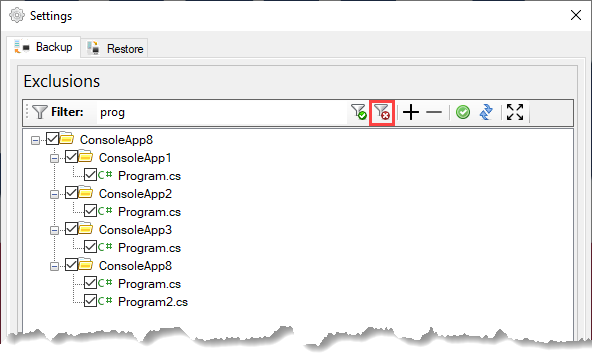
To clear the filter and start a new search, click the  button.
To collapse all the list, click the ![]() button.
button.
Click the  button to expand all of the nodes.
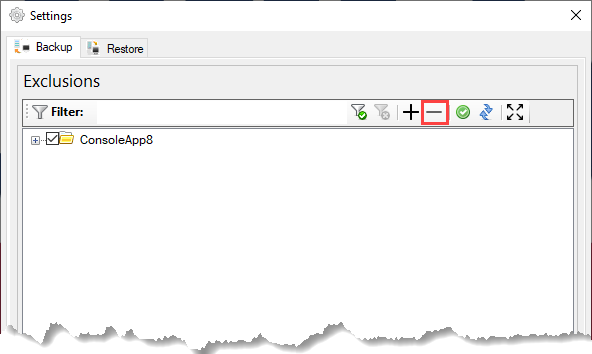
To reset all un-chedked items, click the  button.

To refresh the list, click the button
To display more of the Exclusions list, you can "PopOut" the list by clicking the  button. The buttons on this form will work the same way as the buttons do on the collapsed exclusions list.
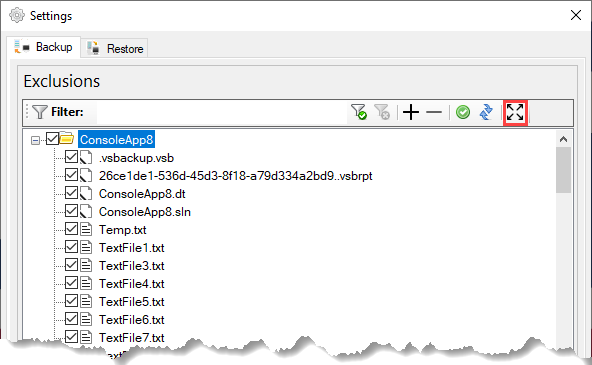
To "Pop-In" the exclusions list, click the  button.
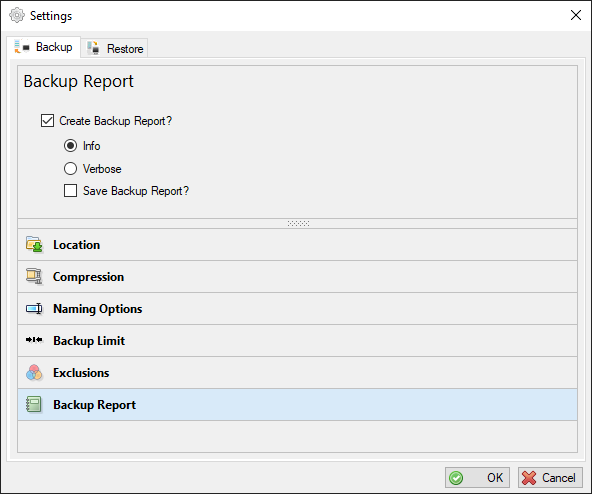
Backup Report
To create a backup report, select the Create Backup Report checkbox.
Choose the Info option for basic backup operation information.This is the default. For more detailed backup process information, choose Verbose.
To save the Backup Report for later viewing, click the Save Backup Report checkbox.
Restore Settings
To change the restore settings, click the tab labeled Restore.
Location
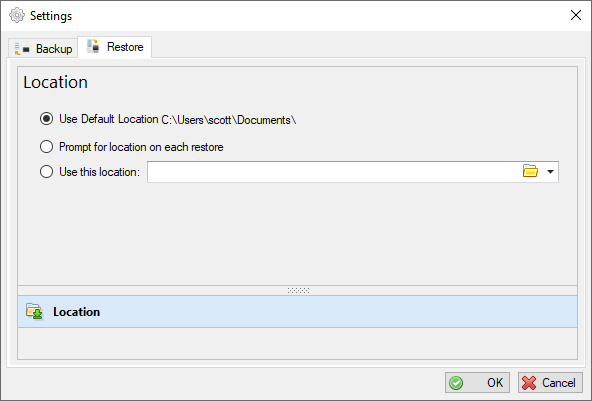
There are three options for setting up the restore location for the backup:
- Use Default Location The restore will always be stored at this location.
- Prompt for location on each backup Displays a prompt for the location of the restore.
- Use this location
Allows you to either type in a location, select a location by clicking the folder button,
 or selecting a previously saved restore location by clicking the drop-down arrow.
Options
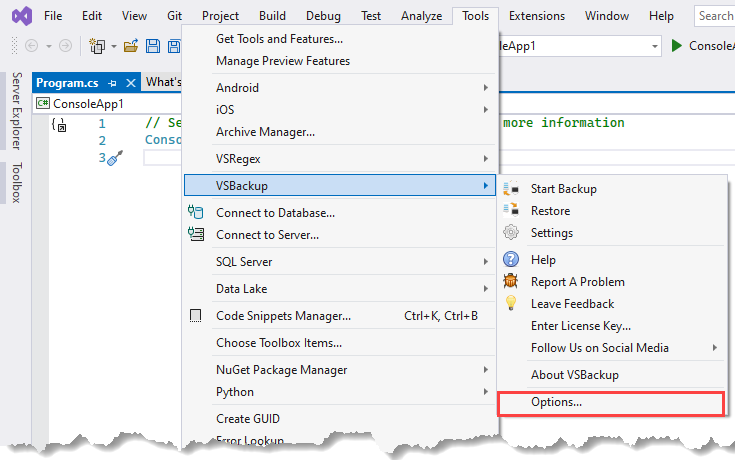
To access the options for VSBackup, you can click Tools Options and scroll down to VSBackup or you can select the click the Options menu item on the VSBackup menu.
Backup Events
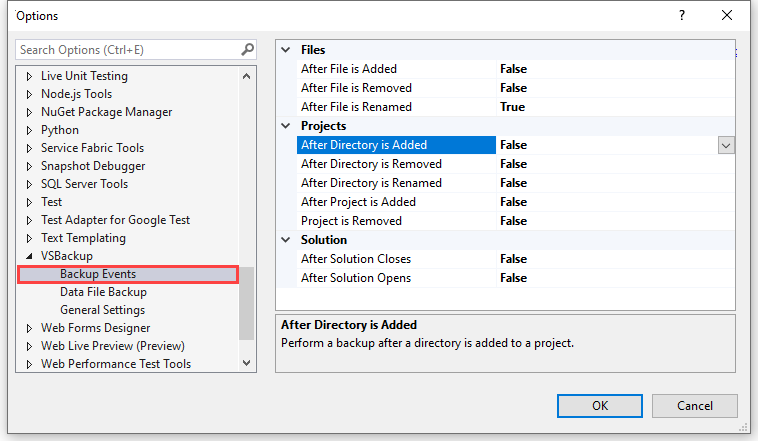
You can now back up your solution when an event fires in Visual Studio. Select either True or False from the drop down for each option and then click the OK button to save your changes.
Data File Backup
To back up the data file, go to Tools Options VSBackup and select the Data File Backup.
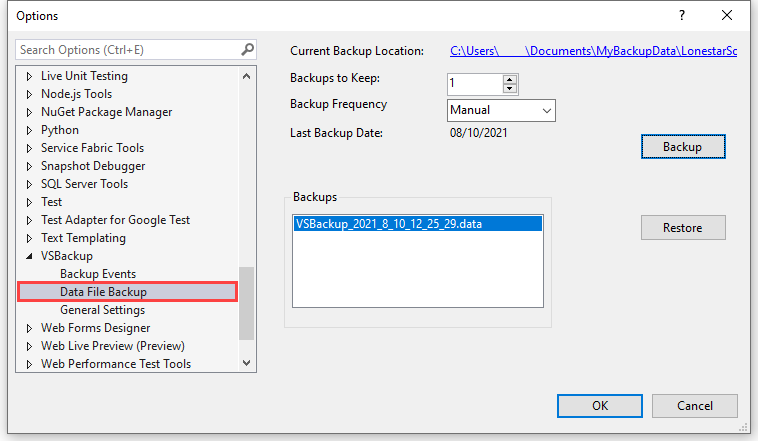
To keep to only a of certain of backups, change the Backups to Keep value by clicking the down or up arrow button.
To change when the data file will be backed up, select an option from the Backup Frequency drop-down. The Daily, Weekly, or Monthly options can only be chosen if a manual backup has been performed first. These backups will occur when the solution closes.
- Manual - The backup will not be done automatically and will be performed every time when the button is clicked.
- Daily - The backup will occur every day after the last backup date.
- Weekly - The backup will occur every 7 days after the last backup.
- Monthly - The backup will occur every 30 days after the last backup date.
To restore a data file backup, select the backup you want to restore from the list.
Then click the Restore button. You must close then open a solution to reload the backups for that solution.
General Settings
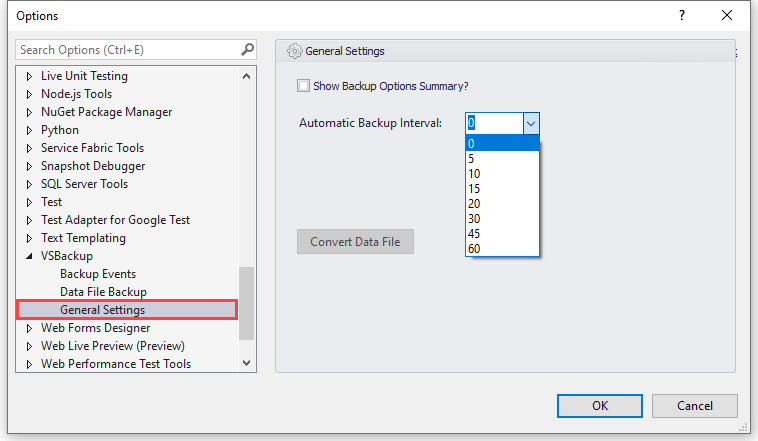
To turn on or to turn off the backup settings summary form, check or un-check the Show Backup Options Summary checkbox.
To initiate automatic backups at a specified interval which are in minutes, select the value from the drop down labeled Automatic Backup Interval. Selecting 0 will turn off the automatic backups.
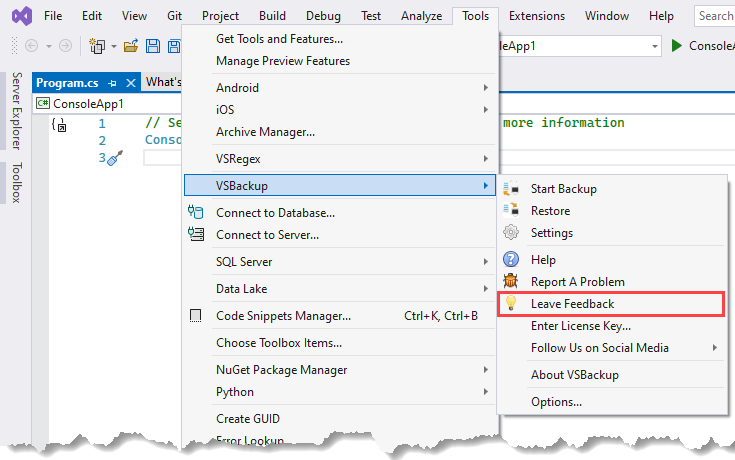
Leaving Feedback
To leave a suggestion or feedback on how we can improve VSBackup or to rate VSBackup, click the Leave Feedback menu item.
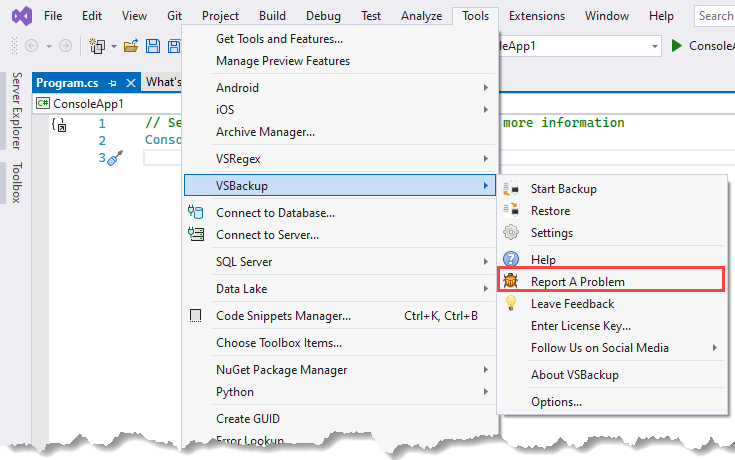
Reporting Issues
To report an issue, click the Report a Problem a Problem menu command. The Report a Problem form will also be displayed if any catastrophic issue arises.
Release Notes
| 8.0.1201.2023 – 04/02/2023 | ||
|---|---|---|
 | Exclusion of files and folders in the backup process. | |
| Limit the number of backups to keep. | |
| Display an icon next to a backup that has a note. | |
| Links for social media sites. | |
| 7.0.1054.2022 – 12/03/2022 | ||
|---|---|---|
| Exclusion of files and folders in the backup process. | |
| Limit the number of backups to keep. | |
 | Robosharp, a .NET wrapper for Robocopy is now used for backup operations. | |
| Display an icon next to a backup that has a note. | |
| Links for social media sites. | |
| 6.7.1005.2022 – 03/27/2022 | ||
|---|---|---|
 | Installation targets were not correct. | |
| Modified the link for the VSBackup web page. | |
| 6.6.1004.2022 – 03/21/2022 | ||
|---|---|---|
| Problem Report and Feedback submission was not working. | |
| 6.5.1003.2022 – 03/21/2022 | ||
|---|---|---|
| The purchase link was incorrect. | |
| 6.4.1002.2022 – 02/08/2022 | ||
|---|---|---|
| Problem Report and Feedback submission not working. | |
| Purchase link was pointing to the wrong web site. | |
| 6.3.999.2022 – 01/24/2022 | ||
|---|---|---|
| The Restore location options were not being set correctly. | |
| The Restore process was not working correctly. | |
| 6.2.996.2022 – 01/20/2022 | ||
|---|---|---|
| The backup location options were not being set correctly. | |
| 6.1.995.2022 – 01/18/2022 | ||
|---|---|---|
| An error message was displayed when clicking the Report a Problem menu item. | |
| 6.0.994.2021 – 01/17/2022 | ||
|---|---|---|
| A note can be added to a backup. | |
| Backups list can be filtered by a date range. | |
| The Options item on the VSBackup menu can take the user directly to the Options page for VSBackup. | |
| The Help item on the VSBackup menu can take the user to the documentation web page for VSBackup. | |
| The backup operation is enclosed in a thread. | |
| Additional Backup options. | |
| Additional Restore options. | |
| Redesigned the Settings form. | |
| 5.1.980.2021 – 11/23/2021 | ||
|---|---|---|
| The Install Targets were incorrect in the VSIX manifest file.. | |
| 5.0.979.2021 – 11/20/2021 | ||
|---|---|---|
| Converted to Visual Studio 2022. | |
| Minor bug fixes. | |
 | Data File Conversion. | |
| 4.2.979.2021 – 11/07/2021 | ||
|---|---|---|
| Converted to Visual Studio 2022. | |
| 4.1.974.2021 – 11/01/2021 | ||
|---|---|---|
| Minor bug fixes. | |
| 4.0.944.2021 – 09/13/2021 | ||
|---|---|---|
| A context-menu with Hard, Soft, and Restore commands is displayed when a backup item is right-clicked. | |
| When the Backups area is right-clicked, a context-menu will display with the Refresh command. | |
| Menu items are grouped and re-arranged. | |
| Backups can be performed when certain events in Visual Studio are fired. | |
| Buttons for Hard Delete, Soft Delete, Restore, and Refresh operations are on the Backups Toolwindow. | |
| 3.1.550.2021 – 06/30/2021 | ||
|---|---|---|
| Going to Tools --> Options --> VSBackup causes Visual Studio to crash. | |
| The backup location is not saved. | |
| The License Key activation fails. | |
| 3.0.340.2021 – 05/10/2021 | ||
|---|---|---|
| Feedback, a suggeston, or a rating the extension can be given. | |
| The VSBackup menu on the Tools menu. | |
| 2.2.352.2021 – 04/03/2021 | ||
|---|---|---|
| The name of the backup is the solution directory name instead of the solution name. | |
| 2.1.342.2021 – 04/01/2021 | ||
|---|---|---|
| Various UI modifications. | |
| 2.0.340.2021 – 03/26/2021 | ||
|---|---|---|
| Various UI enchantments and modifications. | |
| If a backup is selected to be restored and if it does not exist, there is an option to remove it from the backup list. | |
| The ability to Zip (compress) a solution. A password for the Zip file can be set. Also, an option to Zip the solution when it is greater than a specified amount has been added. | |
| Sorting can now be performed on the Backup Date/Time and Name columns in the Backups list. | |
| An icon will appear next to the backup denoting the type of backup, directory or Zip. | |
| There is 30-day trial period of the extension. When the trial period ends, backups can no longer be performed. | |
| Data file format change. | |
| 1.5.102.2021 – 01/21/2021 | ||
|---|---|---|
| When the extension failed to load in Visual Studio 2017 due to an assembly reference issue. | |
| 1.4.101.2021 – 01/12/2021 | ||
|---|---|---|
| When opening a solution in Visual Studio 2019 using the Open Recents dialog, the Visual Studio events would not fire causing the backup settings and backups not to load. Nor could a backup profile be created. | |
| 1.3.100.2021 – 01/06/2021 | ||
|---|---|---|
| Logging. | |
| 1.2.99.2021 – 01/06/2021 | ||
|---|---|---|
| Upgraded for Visual Studio 2019 | |
| 1.1.93.2021 – 01/01/2021 | ||
|---|---|---|
| >When submitting a Problem Report, leaving a required field empty and then filling it in would result in a loop when re-submitting the Problem Report. | |
| 1.0.87.2020 – 12/24/2021 | ||
|---|---|---|
| Initial Release | ||